Refurbishing Old Hand Planes Part 2: Truing the Frog
Welcome back! If you’re still with us after reading part 1, you are a most curious soul. I mean, how could you not be to withstand so much of my boring writing in the name of woodworking?!
So now the sole of the plane is flat. I would have to say that 80 percent of your grunt work here is done…..but there are a few other crucial things left to accomplish. If the bottom of our plane is flat, we need to ensure that the rest of that translates all the way up to the plane iron, because what have we really accomplished if we stop here? Flattening and truing the Frog isn’t JUST to make it parallel to the sole, it also ensures we have a mating surface for the blade to rest on the whole time the plane is in operation. When this surface is not flat, we get that ever so annoying movement named “chatter”. As the plane iron skims across the wood substrate, it will unseat itself and bounce around on the surface of the frog, causing an inconsistent cut.
Refurbishing Old Hand Planes Part 1: Flattening the Sole.
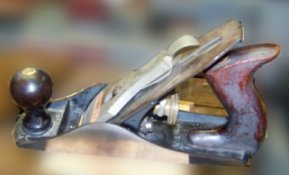 A couple of weeks ago, I decided on a whim to refurbish a couple of the tools I inherited from my father-in-law: A Block Plane and a Stanley #4 hand plane. Both had really bad surface rust, and were REALLY cupped from years of heavy use. To give you an idea of what I dealt with before, I used that #4 on a scrap piece of pine stock
 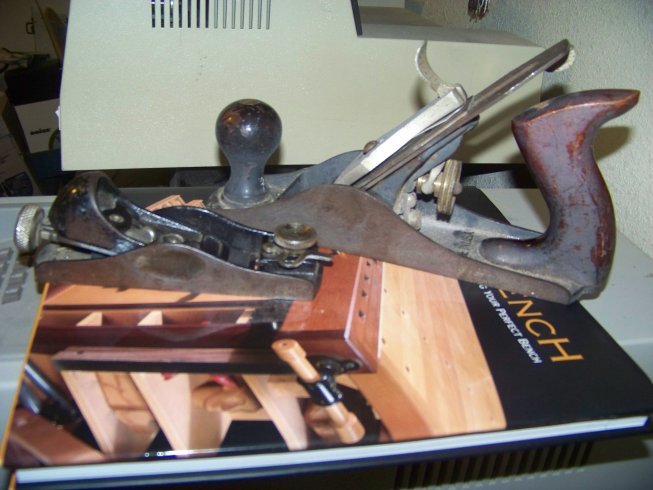 and got nothing but crooked, toothpick sized shavings with every pass, and small chunks of sawdust. I didn’t chronicle the restoration of the block plane (it was a spur of the moment thing), but have documented the restoration of the Stanley #4 pretty thoroughly.
Join me in this journey in the next couple of articles.
The cause of my check engine light illuminating.
It seems as though I have been reactively fixing a lot of things these days. Last weekend, it was the garbage disposal. This weekend, the problem child was my truck.
I was on the way to facilitate communications for a disaster drill sponsored by Rockwall County CERT, and after just entering the on-ramp for I-30, my check engine light came on. This would be the first time since I have owned the truck that it has happened (amazingly, the first time in 5 and a half years). The truck seemed to be running perfectly fine. Voltage, oil pressure, temperature…. all fine. I continued to my destination. Upon finishing, I went to go get the trouble code pulled off of the computer. (FYI: A lot of auto parts stores and oil change shops do this at no cost now) P0442 was the code. I had dealt with this code before on our old Mazda and knew it was something to do with the Gas Evaporation Control System. Just to be sure, I went online to http://www.obd-codes.com and verified that it was due to a small vacuum leak in the system. It’s usually a problem of the gas cap not being on tight enough, but I’m very sure about making sure it is on tight. I called my step-father, Victor (a lifelong and AWESOME automotive technician), to get his opinion on it, and he said the vacuum hoses were very defective (read: total crap) in these model trucks (2003 Dodge Dakota), and became brittle after a while. The end result was splitting at the end of the vacuum lines, rendering a leak.
After doing some maintenance on my sister-in-law, Julie’s car on Saturday, which involved taking half of the front end of her Hyundai Tiberon apart to get to where the headlight bulbs go, I was ready to concentrate on this.
I opened the hood and traced the vacuum hose from the EVAP charcoal canister and sure enough:
(Click for full size image)
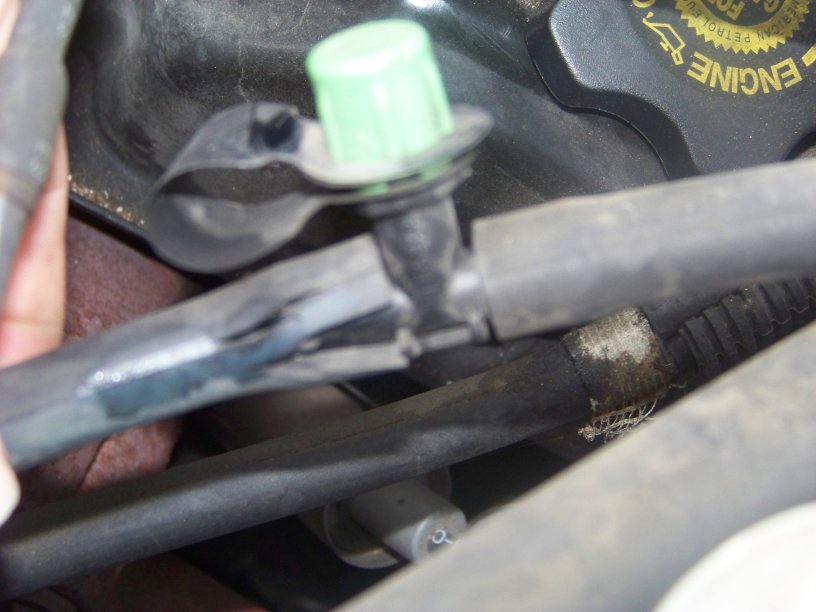
A HUGE split in the hose where it meets the purge. So, I pulled the hose off and got 3 feet of it from the auto parts store. It involved a lot of careful routing, since Dodge decided to strap it to the other hose pulling vacuum from the engine. These were both taped with electrical tape and routed under the fuse box. I had to loosen it to get down to where I could free the damaged hose.
So, after all of that, I am back up and running, for now.
Antenna Solutions on the cheap
This past May I had the fortunate experience of riding with Kent Britain, WA5VJB to the Dayton Hamvention in Ohio (he may tell you otherwise). Among other things, Kent is an exceptional antenna designer, with projects on his resume that include antennas that were conceived to reside in the second stomach of a cow (Try to figure out THAT dielectric constant!). You may have read his articles in CQ and CQ VHF magazines. He kind of knows a thing or two. I crap you negative.
Anyway, what I came to tell you about are a unique design approach Kent has for low cost antennas. Before Dayton, a group that I do some hobby work with was looking for a directional WiFi antenna to interface with a Linksys WRT-54G router that was powered by PoE (power over ethernet) and mounted to the side of a piece of antenna mast. The project was created out of necessity to reach a ranger station that was just out of reach for our stock omnidirectional antennas. We ordered some of these from Kent:

What you see are two high gain antennas for 2.4 GHz designed onto printed circuit boards! Here are the datasheets:
Quad Patch antenna datasheet (sadly, this antenna has been discontinued)
We ended up using the Quad Patch for a few reasons. First, we could easily mount it to the side of the weatherproof telecom box we strapped to the tower (the router was mounted inside). The polarization needed by the Yagi to work did not line up with the tower leg we were using. Second, according to the datasheet, ir provides 11 dBi gain, which, in retrospect, was overkill, but who cares.
They work GREAT and do a lot better than a “cantenna”, (Which, if you model it with antenna software, has some serious flaws).
So, if you are on a budget, or just want a great antenna for your project, I highly recommend you check out Kent’s website over at http://www.wa5vjb.com. More on our WiFi project in a later article…..for now, go build your own!