For those following along, welcome back! For those of you just joining us, we’ve been talking about how to restore an old Stanley #4 hand plane. If you’d like to catch up, feel free to check out part 1 and part 2 beforehand.
We’ve got our sole flattened and our frog is true, and now it’s a good time to address tweaking a few of the components that deal with chip removal: the plane throat, and the chip breaker.
First, for some, I may have to justify what I am about to do. A lot of people skip this step because they are more concerned with the blade being sharp and removing thin layers of material that look like a piece of lace in my grandmothers china hutch. The simple fact of the matter is, planes don’t JUST remove really thin layers of material, but thicker ones as well (in woodworking, we refer to this as a more aggressively tuned plane). These, above others, have a tendency to bind in the throat of the plane because they are more rigid and stronger than their thin counterparts. Any good plane should be set up to plane thick shavings as well as thin ones.
Let’s imagine, through the magic of bitmap graphics, a side cutaway view of what our planer looks like with an unmodified chip breaker and shavings being removed from a piece of wood stock (Ok so my animation skills are terrible and this isn’t EXACTLY like it might look, but you get the idea):
If your shavings don’t perfectly roll up inside of the plane (and let’s face it, they rarely do), then they need somewhere to go. Notice on the circled areas of the cutaway view where our major binding points are: the throat opening, and where the chip breaker mates with the plane iron.
Again, using a little imagination, here’s a modified cutaway of what we’re going for:
I see my faithful readers getting irritated with my long-winded explanations, so on with the modification!
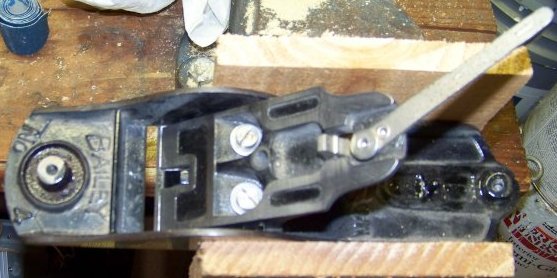
First, I chuck the Planer sole into a vise, using some scraps (in this case, some offcuts from a new cedar fence I just finished) to protect the metal:
Using a flat file, I made a relief cut into the lip of the throat, taking care to not touch the bottom edge. We don’t want to widen the width of the bottom of the throat, as that will affect the way our planer cuts, just the top where the shavings are in danger of binding. This is approximately a 15 degree cut (perhaps slightly more) from our previous vertical in the throat. Most of the reference that I read prior to doing this mentioned to make the sole vertical, but I disagree. In my opinion, it’s easier to get a feel for your progress when the sole is horizontal (applying steep downward force from the sole top) than trying to file with the sole vertical (shallow upward thrust from the sole bottom). This also helps prevent accidentally filing away the bottom and enlarging the throat because more attention is given to where the file is, and we’re not cutting in the great unknown. Use whichever method works better for you, though.
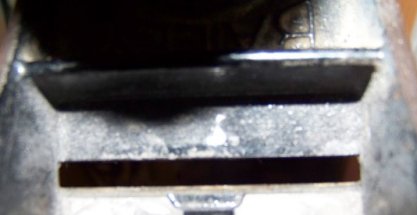
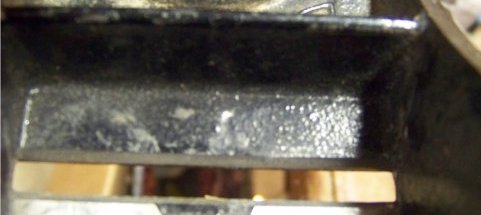
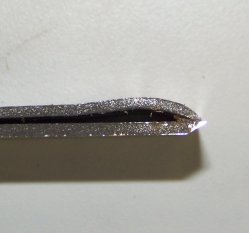
Here’s a before and after picture so you can get a feel for how much material was removed:
The next thing we’re going to want to do is modify our chipbreaker so the tip of it is not elevated from the top of the plane iron. Apparently, my father in law, or whoever owned the plane beforehand, did this step for me, so I really don’t have a lot to demonstrate except for what it’s supposed to look like and a quick pictorial of how it is done. In order to achieve a result similar to the above, you must re-establish the bevel of the chip breaker so that the tip contacts the plane iron rather than the heel (In other words, we’re gonna make the angle steeper). This can be accomplished by going back over to our piece of float glass where we’ve pretty much done all of the milling work to our plane:

Notice how the chipbreaker is hanging off of the edge of the float glass (I’ve got the float glass elevated on a piece of 3/4″ MDF), and only the tip portion is contacting our sandpaper. Using a side to side motion, rub the chip breaker against the sandpaper until your new, steeper angle forms. The tip should cleanly contact the back of the plane iron upon reassembly, and don’t worry about it if there happens to be a little space in between the heel of your new bevel and your iron:
The last thing we want to do to the chipbreaker is smooth the surface where the curvature on top meets the blade. We need to do this so the shavings glide over instead of hang and get caught on the chipbreaker. Again, we will turn to our finer grits of sandpaper attached to our float glass to accomplish this. A lot of people use a honing guide to smooth the surface, but I don’t like that approach. It creates a flat spot if you go too far. The method I used was just to run the surface across the sandpaper, rocking the chipbreaker back and forth over it’s ridge to distribute where the material was being removed. This worked pretty well, and as you can see, leaves the top shiney smooth:

Now that we’ve done all of this modification to this old plane, I couldn’t help but to see if I was achieving little more than sawdust and toothpick shavings. Since the edge of the plane iron needs to be re-established, I briefly sharpened it with the same flat file I previously used, and reassembled the plane. Here’s a short video of the plane that we’re bringing out of retirement up to this point:
Not quite perfect, but certainly better than sawdust! Next time, we’ll put the finishing touches on our plane restoration by completely re-establishing the bevel on our worn plane iron and demonstrating proper sharping technique. See you then!
Related Posts:
Refurbishing Old Hand Planes Part 1: Flattening the Sole.
Refurbishing Old Hand Planes Part 2: Truing the Frog
Refurbishing Old Hand Planes Part 4: Sharpening the iron
HI – thanks for this great site. I have a fantastic Stanley 14inch Bailey plane that was my grandfathers. Its in fairly good shape other then missing the frog’s blade pivot lever. It seems this piece was riveted to the plane you refurbished. Is it possible to use my existing frog and rivet a pivot lever to it or would I need to get a new frog. More then happy to send you a picture. Thanks again for the great detail and work here.
Steve
Hi Steve, yes, a picture would be helpful. Please send it to eric at this domain. The only part of the lever cap that is pinned together on mine is the actual lever-to-cap mechanism. Other than that, it’s all pretty removable. I will help in any way possible to get yours back up to working shape, though. Mine is still serving me extremely well even though it took a deep scratch about a month ago that bummed me out.
you said, “I see my faithful readers getting irritated with my long-winded explanations” but i want you to know that i some of us out there, we feel exactly the opposite. i get irritated with short, too-simple explanations. i waste so much time looking at search result after search result, sometimes, of lots of consecutive very short answers that are not helpful, and a lengthy, substantive, detailed blog post is exactly what i’m always looking for. i just don’t feel like it’s worth reading something or learning something if you’re only going to brush the surface. i want detail, lots of detail. the stuff i don’t want to know, i can always skim. so, please, don’t apologize, and don’t give up on being very detailed. it’s a rare thing online these days! 🙂
Thanks for your kind words, they mean a lot to me! I will keep it in mind that the detailed descriptions have their place in the future. I’m with you. When I read instructional articles and I don’t “get it”, there’s generally a lack of information.
Thank you so much for this restoration instruction!!! There is so much info out there, and I found your guide to be the most helpful by far!